|
STEERING:
Why this is important: 1) keeps the bike upright due to the "magic" of the play in the spring loaded steering arm, 2) governs
how responsive the bike is to transmitter steering input, and 3) greatly affects how the bike reacts during cornering at full
lean. When I put together my first R/C bike I made the rookie mistake of setting the steering arm like an R/C car and hooked
up the servo arm to the steering head via rigid arm w/o springs. When I launched it and gave it throttle it flopped back
and forth from its crash bars like a fish, undriveable. Why? Because there was no "play" or "slop" in the steering arm to
help balance the bike on it's own two wheels. Think about riding a bike. Are you holding the handle bars tightly? Maybe.
But are you holding the handle bars in one direction tightly? NO. You are subconsiously making subtle tiny movements left
and right to keep the bike upright. That is the function of the spring loaded play. Another way to put it is that the steering
input on an R/C bike is "suggestive" rather than "direct" like R/C cars.
ARM CONNECTION: Connections from the steering arm to the servo horn and steering head are done using ball joints - make sure
they are smooth and free to rotate without any noticeable friction. When attaching the arm to the servo horn, it should make
a 90deg. angle from the servo horn to the steering rod while the steering head is pointing straight forward. This is to ensure
you have equal L/R throw in both distance and rate. If unable to get the steering head straight then lengthen or shorten
the steering rod. It is also nice to have the arm connection on the steering head to be perpendicular to the steering head
shaft, but not as important as the servo horn 90deg. angle. 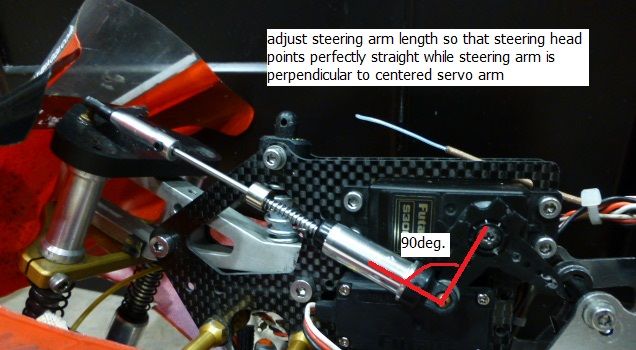
To turn the bike left the steering head needs to turn to the right and vice versa (called "countersteering"). At first this
sounds counterintuitive but get your bicycle again (doesn't need to be moving, just stand it up) and notice that when you
turn the handlebars to the left, the bike falls on it's right side. So make sure the steering servo is set in the correct
direction on your transmitter. 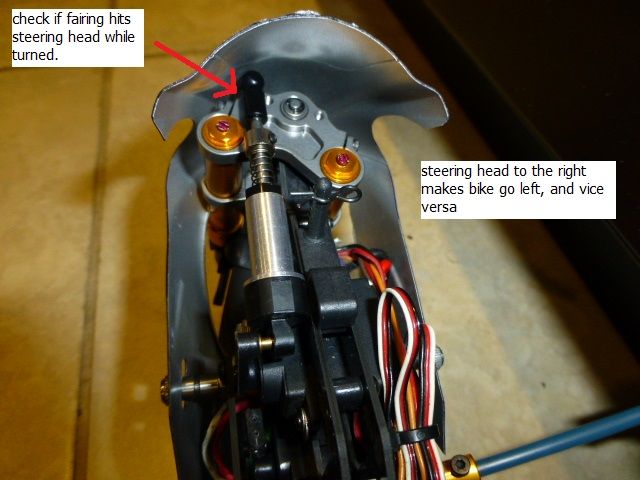
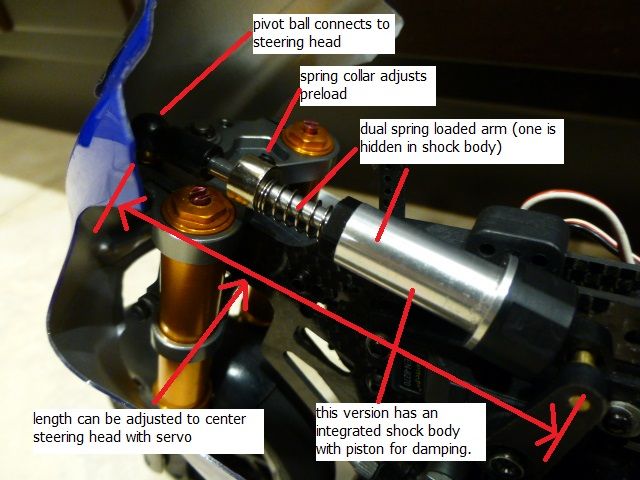
SPRINGS: The most common type of steering arm includes two identical springs to form the "magic" play and a steering damper,
sometimes neatly combined into one (usually expensive) component. (I'm not going to talk about alternative methods of steering
i.e. HOR swivel method, or fuel tubing method). 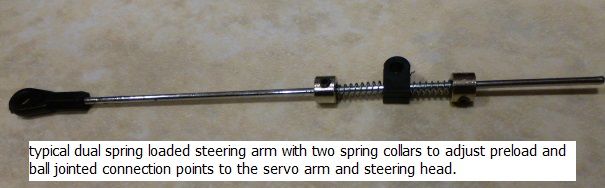
The steering springs must be equal in length and spring rate or else you won't get equal response between going left and right.
This also applies to dual steering arm methods which use the push/pull concept. Next adjust the preload on the springs so
the spring stops are touching the spring ends or slightly preloaded against the ends. This is to remove the "dead" play in
which there is no spring loaded action, this causes your bike to "wander" while going straight. 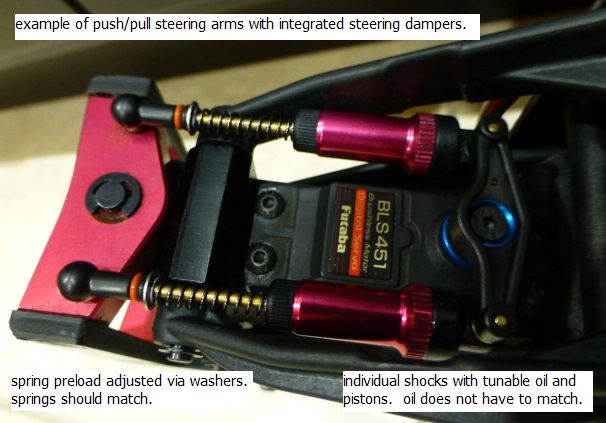
The stiffer the springs the more steering response at high speed which is nice, but it is also less stable going straight
because the "magic" steering play is reduced. Because of this, when the bike is at full lean, the bike will want to go upright
again unless you hold the transmitter stick in the direction of the turn like an R/C car. Conversely, lighter springs mean
less steering response at high speeds but more stability due to more steering play. When at full lean, the bike will want
to keep laying down in the turn until you turn the stick the other way. The turn radius is more controlled by throttle (i.e.
more throttle, bigger radius). There is no one correct spring rate, it's all in your preferred driving style. For beginners
I would start with springs on the softer side and work your way up in stiffness until you are comfortable with the handling.
Keep in mind when you switch springs, then you also have to switch driving habits especially handling corners. Also it is
important to note that when changing to a heavier front wheel, then the spring should also get stiffer to compensate for the
extra weight.
DAMPING: Good steering dampers consist of a shock body, oil, and piston connected to the steering head. You can run without
a damper (especially if you have a slow motor), but if you encounter any sort of headshake when the bike is going straight
at high speed then you will need it. For push/pull dual steering arm mechanisms with two dampers, the shock oil does not
need to match like steering springs. You can mix/match so damping is finely adjustable. Only use as much damping as you
need, I would start by using a very light oil in one damper (10-20wt) and work your way up from there (try going up to 3000wt
diff. oil if needed) until the high speed wobbles and headshakes are gone. Be aware if the arm is over damped, then the "magic"
steering play is reduced and you get the undriveable flopping back and forth of the bike. 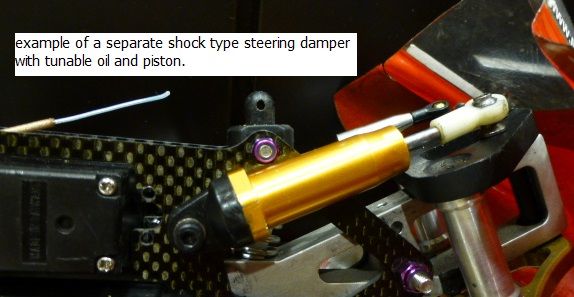 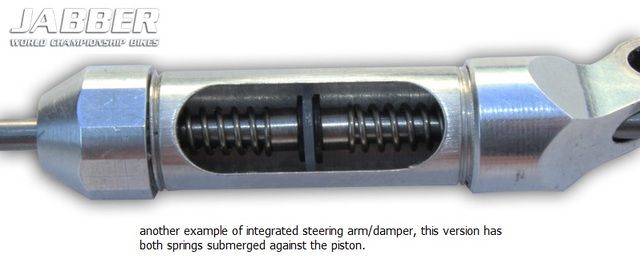
CHECKING FOR BINDING: A first check would be to remove the steering arm from the steering head and see that the front wheel
is able to turn left and right freely without any friction in the steering bushings/bearings. After reconnecting the arm,
turn the transmitter on and make sure that when steering that the steering arm doesn't rub on the frame or steering head -
once it hangs up on something you will lose steering control of the bike. Move the transmitter stick to full left and full
right and lower the dual rate until you can still rotate the steering head freely via the spring while at the steering end
points. If at one end point you can't rotate the steering head freely (i.e. one spring is fully compressed and can't work
anymore), then continue to dial down your dual rate. The reason for doing this is to allow the bike to continue to balance
itself at full L/R throw. If dialing down the dual rate makes the bike feel less responsive, then time to switch springs
to stiffer ones. Finally, see if there is any binding of the steering head, arm, or damper with the body fairing clipped
on, if it catches on anything, cut away at the front fairing and/or move the bodywork more forward. 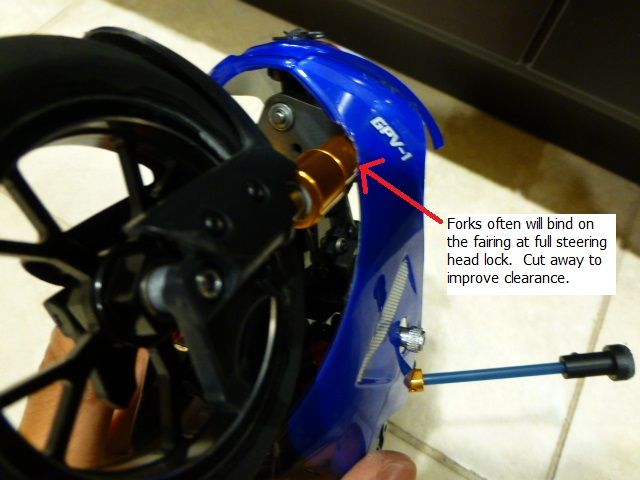
FINE TUNING: Subtrim should be adjusted on your transmitter on the fly, do this while driving your bike straight (difficult
at first, takes practice). If you have to adjust subtrim a lot then readjust the steering arm length. Check that the steering
response matches left to right. These can be adjusted by changing the L/R endpoints on your transmitter. After any of these
adjustments, make sure you redo the "checking for binding" step. Lather, rinse, repeat!! If the bike is unresponsive to
turning input then consider adding preload to the springs (but make sure there is still steering play at the end points) or
changing to stiffer springs. If the bike is too responsive then switch to lighter springs. If the bike wants to stand upright
while cornering, consider adapting your driving style to keep the transmitter input turned during the corner, or change to
lighter springs. When changing springs, damping may also need to be changed (likely in the opposite direction of the spring).
Whew! Congrats for reading the longest but most important section. Dont' worry, it gets easier from here. . .
LEAN ANGLE:
Why this is important: Too little lean angle and you can't corner at a decent speed (think of a kid's bicycle with training
wheels). Too much lean angle and the bike will lose tire sidewall grip going into a turn and fall down one one side to the
point where you can't drive it back up, or it will have trouble trying to get back upright coming out of full lean (when
putting together your bike you will be tempted to just lay the bike down on a flat surface and set the lean angle to its maximum
without touching the bottom fairing. . . don't do it!!) Crash bar length is used to setup maximum lean angle. General rule
of thumb is to set your lean angle down to the furthest point where you can still drive the bike upright from laying on the
ground. Advanced drivers can get away with setting an insanely small lean angle and still corner consistently without reaching
the grip limit by limiting crash bar contact with the ground. This setup is too risky for me, but makes sense why this would
be the fastest way around any track. Case in point if you look at the fastest way around the corner not only do you want
to be at the furthest lean possible that grip will allow but also to where your crash bar is barely touching the ground as
this scrubs off speed. 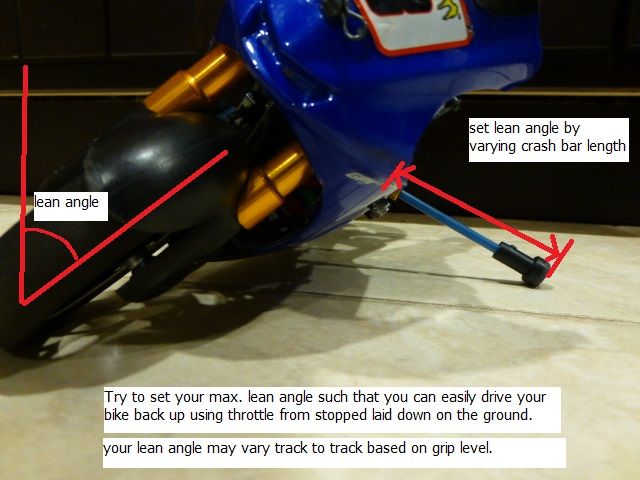
CRASH BAR SETUP: Crash bars not only affect lean angle but also performance of the bike at full lean. Originally R/C bikes
were built with metal crash bars which were great for setting a consistent lean angle and also wear down less. The downside
is that they are less smooth when scraping on the pavement, scrubbing off speed in the process. Also in a crash, if the bike
lands on a crash bar then this results in a bent bar and/or broken chassis both of which will ruin your race. Nylon bars
are flexible and will spring back to shape. Crash bars are located near the center and high on the bike in order to keep
even pressure on the front and rear tires at full lean, and to make the bike more difficult to tip over onto the rider (non-wheel
side). 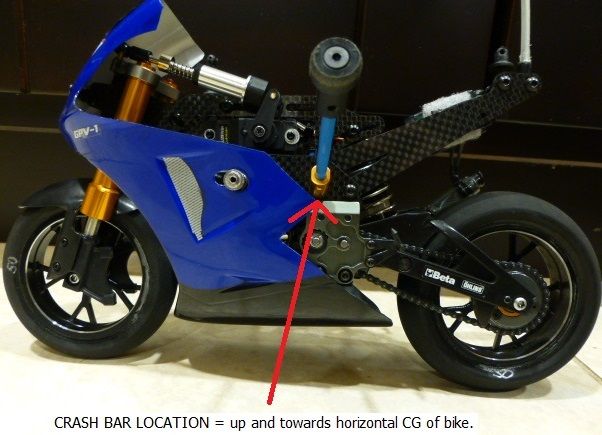
What crash bar bend shape is preferred, round, or square? If you have the ability to bend thick nylon bars into a square
shape this would be preferred due to more evenly distributed wear along the bar. Lastly, crash bars are angled upwards from
the bike chassis in order to have a less severe contact angle with the ground. Instead of contacting the ground at the far
edge, the ground contacts the underside of the bars which allows more even wear and smoother contact with the ground. Keep
in mind that running nylon bars in this manner tend to flex upwards while the bike is laid on the ground so you may have to
size them slightly longer to limit bike lean angle (treat nylon sliders/rollers crash bar systems similarly). 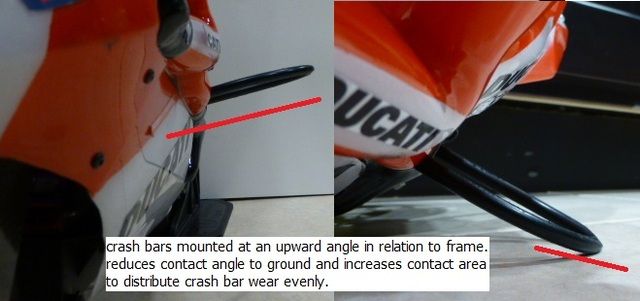 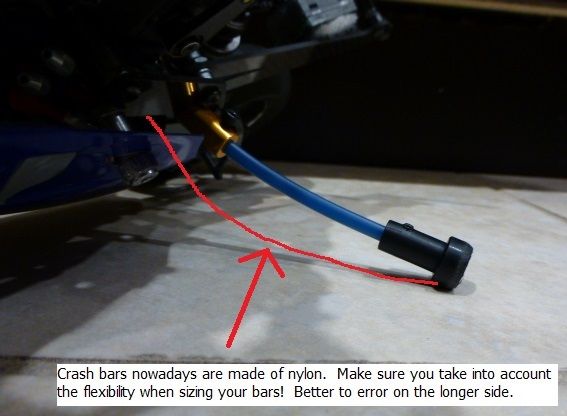
TIRES/INSERTS:
Why they are important: the right tires allow the bike to get the power to the ground without slipping/sliding. With bad
tires, an R/C bike is undriveable especially braking into and throttling out of full lean. In essence, tire quality affects
how much lean angle the bike can handle without getting loose (HINT: be prepared to experiment with different crash bar lengths
at the track). They also affect how fast you can slow down the bike via rear or front brake. Tires are easiest to change,
but the most costly ($50-$100 for a pair of tires). Rule of thumb is use whatever tire/insert setup the fast guys use so
you can buy those straight away instead of spending time and money experimenting yourself. Pay attention to track temp. also
as certain compounds only work well in a specific temp. range. So, if you plan on running year round then you might want
a set of softs and hards to switch around with. What if you're the first one to run at your track? Well time to start experimenting!
Try starting out with the softest compound rubber you can find. As for inserts run the hardest insert possible, either a
very dense foam or solid plastic, in order to maintain a consistent tire rubber profile whether the bike is standing up or
leaned over.
For those that plan to forgo the preglued tires and just glue their tires onto their own rims be very particular in how you
go about this. If not secured on correctly then during a race your tires can come off the rim and this ends your race immediately
due to making the bike undriveable. Make sure the rim and tire are properly prepped, which includes cleaning with sandpaper
and solvent. Then make sure you use the right glue and be prepared to leave it compressed in that state for 4-6 hours before
proceeding to gluing the other side. It's a tedious process so you do begin to appreciate the pre-glued tires despite the
increased cost. Every now and then it's a good idea to try to pry off the tire and see if you need to reglue. There is nothing
worse than a tire falling off during a race. For this reason I always try to carry a spare set to the track as gluing is
a 24 hour process. 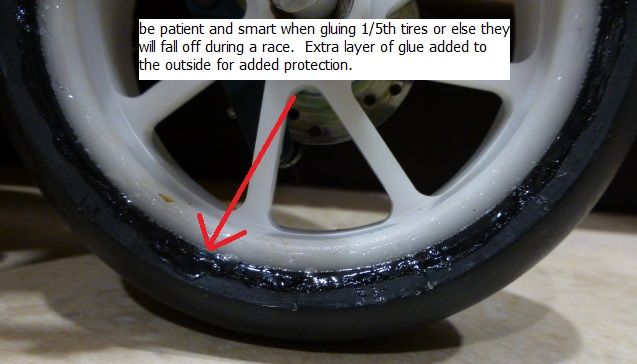
IN SUMMARY:
STEERING: ensure there is the "magic" steering play in the steering at straight ahead and also at full left/right throw.
Choice of spring rate is highly dependent on your driving style and preference. Add only as much damping as your require
to keep the bike stable on the straight, too much and you lose this "magic" steering play.
LEAN ANGLE: run the shortest crash bars to where you can still drive the bike upright from laying on the ground. This may
need to be adjusted for every track due to different grip level conditions.
TIRES/INSERTS: use what the fast guys use (or what you have researched online that is proven to work). Take your time when
gluing them so they don't fall off mid-race.
GOOD LUCK!!!
|